Before starting the terrain pieces, my first step is to determine the Order of Battle (or OrBat) for each army (or armies if more than 2). This is a listing of all the units for each side that are needed for the scenario and their associated vehicles and equipment. Again, the Rapid Fire books are great for this because they include a complete OrBat for each scenario. I usually separate the figures and the vehicles into separate OrBats. I can then easily determine which figures/vehicles I have and which need to be purchased.
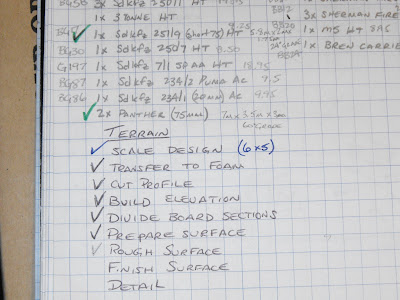
The next step is to plan the terrain pieces. I start this process with a checklist. Here are the basic steps:
The first thing I do is create a scale drawing of the terrain design. The terrain design generally comes out of a scenario book. In this case, Project Foy will be played on a 6'x5' game table (4 sections each 2.5'x3'). Based on this size, each graph square on my drawing represents 2.9". It is not necessary to be absolutely precise in the scale drawing because you will want to make adjustments as you are transferring the design any way.
Here is the scale drawing:
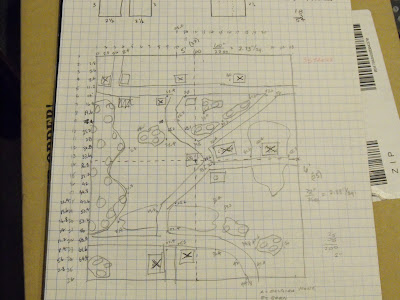
From the drawing, I start identifying the co-ordinates of key points. You can see those notations on my drawing. You can identify corners of buildings, intersections of roads, and inflection points on terrain features or roads. Then it is simply a matter of plotting those same points on the game table. All of our boards start with a 2" polystyrene foamboard base. I added dotted lines to the drawing which represent the board edges. This helps to provide perspective as the design is being transferred.
Once I have enough key points plotted, Sharpie markers are used to fill in the design details. It is helpful to use different colors for different features. I use green for wooded areas, blue for water, red for structures, orange for roads, and brown for changes in elevation. At this point, your board design should look roughly the same as your scale drawing. I can rarely resist the temptation to playtest before starting the actual terrain work. This impatience actually serves a purpose. It is easy to spot places where you potentially want better cover or a smoother surface or more obstacles, or just plain something else. This is where you use your experience running games to tweak the final design.
I also note the elevation change for each brown area. We use a combination of 1" and 2" foam for the changes, but more about that in the next post .....

No comments:
Post a Comment