Well our group has been extremely busy of late putting the finishing touches on our Project Foy board. Early in February we made the decision to skip Little Wars this year. The early dates just really did not line up for us. We attended the show as spectators and played in one of Loren Haberkamps games, but did not run any ourselves. This gave me a welcome respite from the Project Foy board. Even with the extra time, I had to get started on the vehicles and figures to be done by our absolutely for sure debut of Project Foy at Legends In The Spring in early April.
Over this past weekend, we got together as a group for the first full-scale playtest. With a successful playtest, our development project has transitioned into an official convention game:
Kampfgruppe Bohm: Race for the Muese
The Meuse seemed to be within reach. Christmas Eve, 1944 finds a vanguard of the 2nd Panzer Corp within five miles of their ultimate objective for the German counteroffensive in the Ardennes: a crossing of the River Meuse. The American 82d Armored Reconnaissance Battalion and the British 29th Armoured Brigade have been given orders to block any further German advance. Can the cut-off German advance forces hold out long enough for the bulk of 2nd Panzer to arrive and continue their push? Or will the American and British forces be able to push the Germans back and secure the vital routes to the Meuse?
Our game began with the German forces deployed in prepared positions in and around Foy. 82nd Armored had been given instructions to drive all German forces out of Foy and to hold secure the main routes to Dinant from the north and north-east. British 29th Armoured had orders to secure Foy and the Dinant approaches from the north-west and south-west along with the vital crossroads at Boisseilles.
Two recce troops from 82nd Armored led the way for the Americans. A-Troop approached from the north under the command of Major Dave Himm. B-Troop, under Captain Gary Paul made a dash towards Foy from the north-east. Major Himm quickly occupied the crossroads at Sorinnes, finding no opposition. As Captain Paul approached a roadblock just north of Foy, a concealed Panther scored a direct hit on his lead M8 AC, which burst into flames. His green troop was thrown into disarray. The trailing elements of his column backed up to their orginal jump-off point while a bazooka team and a mortar team dismounted and started making their way up a steep incline towards the Panther.
Meanwhile, the British had begun their assualt from the north-west and south-west. C-Company advanced cautiously toward Boisseilles with Major Sir John Cusack in command while B-Company (detached to Captain Paul) rolled through the Sorinnes crossroads heading toward Le Fort Beau. In the distance they could both hear the action to the east, but all was quiet in front of them. This quiet was shattered as the lead C-Company Sherman advanced into town. A concealed German 234/2 AC opened fired and scored a devastating hit. This was followed in rapid succession by AT fire from a Pak40 position east of town that knocked out a second Sherman. The British gunners tried desperately to return fire but could not find the mark. A short gun duel ensued with a German SP75 HT joining the fray. This was enough to knock out the remaining Firefly. Major Cusack had in the meantime raced forward with his HQ Company. He was just entering Boisseilles as C-Company ceased to be an effective fighting force.
Back in the north, Major Himm pushed south from Sorinnes with his Light Tank Company. A short distance into the countryside he encountered what he believed to be a reinforced German infantry company in prepared positions lining the main road to Foy. Pulling back slightly, Major Himm brought his M5 Stuarts on line and proceeded to pour HE fire at the trenches. At just about this same moment the detached tanks of B-Company rounded the corner at Le Fort Beau and headed down the main road towards Foy. Inexplicably, this caused the German infantry to panic. They made the fatal mistake of attempting to retreat along the road towards Foy. They were mercilessly mowed down by the machine guns of B-Company. Only 30 of the 120 men were able to reach Foy. Major Himm sensed that the western approach to Foy was now wide open.
In the east, the bazooka and mortar teams from B-Troop continued to climb their way towards a concealed Panther near Mahene Farm. As they appraoched the crest of the hill, they heard the Panther engine start up. They were just in time to see the huge machine backing out of it's hiding spot and start down the road towards Foy. The teams continued on down the hill and took up positions in the Mahene farmhouse.
Other elements of the attacking force now began to stream towards Foy from the north. A-Troop of 82nd Armored passed through the Light Tank Company and drove south bypassing the now empty German trenches. The Light Tank Company in turn pulled back and headed through the heavy forest between Le Fort Beau and Mahene Farm towards Foy. They were followed by the Motor Company of 29th Armoured. B-Company continued down the main road while the HQ Company of 82nd Armored followed closely behind. Major Himm called in air support for their final push on Foy. He was told a squadron of P-38 Lightnings were enroute but would be slightly delayed by weather. The attack seemed to be moving forward right on plan.
B-Company and the Light Tank Company were poised to enter Foy from the north. As the lead M5 from the Light Tank Company crested a small hill just outside of town, accurate autocannon fire from a German 234/1 AC put it out of action. B-Company was able to return fire from the main road and knock out the 234/1 before it could inflict any further damage. In the confusion, B-Company failed to notice a Panther poised at the Foy crossroads. Luckily, it's first shot caused only minor damage to a B-Company Firefly and the second shot screamed overhead. A Sherman from B-Company was able to get off a snap-shot at the Panther and, incredibly, scored a devasting hit. The Allied forces had no way to know it, but the remaining Panther moving down from Mahene Farm had run out of gas before reaching the crossroads. Foy was about to be overrun.
On the far western flank, A-Troop of 82nd Armored was making good progress in a flanking manuever. Suddenly, their lead M8 exploded in a tremendous fireball. They had advanced straight into a minefield! Major Himm called a halt to the advance and ordered his troop to stay on course but proceed cautiously. He needed his troop to cut the road out of Foy to the south as soon as possible. A-Troop was able to pick it's way through the minefield with only slight damage to their other M8. Their bazooka and mortar team reversed course though and would enter Foy from the main road.
The scene greeting Major Cusack in Boisseilles was utter chaos. As he and his lead Sherman manuvered around flaming hulks of C-Company tanks, they found themselves in a point-blank duel with the German SP75 and 234/2 AC. The lead Sherman lost this duel and was quickly added to the list of casualities. With nowhere to go, Major Cusack reluctantly gave the order to withdraw out of Boisseilles to the west and regroup.
As darkness approached, the battle for Foy moved towards a draw.
The Germans still had an intact infantry company in prepared positions southwest of Foy. 29th Armoured had failed to secure the vital crossroads at Boisseilles. The 2nd Panzer Heavy Company had only lost their SP75. The detached 234/2 with light damage had joined them in their defense of the crossroads. Foy was about to be overrun by 82nd Armored. However, the HQ Company of 2nd Panzer had been holed up in the church at Foy. Since A-Troop had failed to cut the road out of Foy, the Germans had their avenue of escape open. Even though out of gas, the Panther in Foy was in a commanding position to cover this retreat. Also, a German Flak Company was positioned southeast of Foy along the escape path.
Official Victory Conditions
Germans
W - Hold Foy
D - Escape to southeast with 12 figures + 4 vehicles
Allied
W - Destroy German force
D - Capture Foy
Given these conditions, the game was clearly a draw at the point we ended.
Monday, March 2, 2009

Friday, December 12, 2008
Project Foy - Finishing Step II
Our gameboard is nearing completion. We have been trying a new road surface that seems to be just what I was looking for. I need to do some final finishing steps and then I will share the result. In the meantime, we have been finishing off the detail work and adding details to the board like sandbags around prepared positions and fences. We are also working hard on painting all the buildings for this scenario.
One of the ways to make your boards more intersting an realistic is to add small details. I like to simply take a branch or twig and snap off random pieces, letting them drop to the board. I have also started placing fallen trees in some of the more heavily forested areas. Then I place the plants collected from my yard with lichen and moss in groups that look natural. I try to fill-in areas with lots of foliage rather than placing small clumps everywhere. A wooded skewer works well to make a small hole in the base. I try to trim the foliage so that it forms a natural "stem" that goes into the hole. When that is not possible, a little Tacky Glue does the trick. IN any case, if excess glue squeezes out, I toss some dirt around the hole and then brush off the excess when dry. Here is a wide angle shot of one such area completly finished:

And then a close up of the "fallen trees":

You can see that these little details add a lot to the realism.
One of the ways to make your boards more intersting an realistic is to add small details. I like to simply take a branch or twig and snap off random pieces, letting them drop to the board. I have also started placing fallen trees in some of the more heavily forested areas. Then I place the plants collected from my yard with lichen and moss in groups that look natural. I try to fill-in areas with lots of foliage rather than placing small clumps everywhere. A wooded skewer works well to make a small hole in the base. I try to trim the foliage so that it forms a natural "stem" that goes into the hole. When that is not possible, a little Tacky Glue does the trick. IN any case, if excess glue squeezes out, I toss some dirt around the hole and then brush off the excess when dry. Here is a wide angle shot of one such area completly finished:
And then a close up of the "fallen trees":
You can see that these little details add a lot to the realism.
The Rapid Fire book gives a great suggestion for creating the wire fences so predominent in NW Europe. Matchsticks can be used along with unshielded copper wire (12 guage is what I used). Cut the matchsticks into 1/2" lengths. Shave one end into a point (makes it easier to push into board - suggestion from John C. from the BF team). Start with one stick and wind the wire around twice just above center. Layout another stick 1"-2" away and wrap the wire around that stick clockwise at approximately the same height. Loop the wire over the stick and wrap the wire around again counter-clockwise. Repeat this procedure for whatever length fence you need and again for the top strand. Finish with a double wrapping on the end post. Make sure all of your "loops" are on the same side of the fence. When you are done, you have a very nice wire fence.
This is a picture of my prototype, it is essentially unpainted. I would finish this section by painting the posts weathered wood (prime flat black, dry brush brown oxide, highlight brick red or light grey, black wash if needed) and then lightly black washing the wire leaving some of the copper exposed.
When I started the project, I did not own any 20 mm buildings. I ordered several buildings from a couple of different suppliers. Sentry Models has some great items but they are expensive and come unpainted (the US distributor also has to order from the UK so lead time can be long). Hovels has my favorite items and they also offer both painted and unpainted prices. Finally, Monday Knight offers what seems to be a re-branding of some of the Sentry line. Their items are inexpensive and delivery was quick. The models are not as detailed (f.e. no interior), but for the price you cannot go wrong. Dave H. from the BH group has been helping me get the painting done on these. For our scenario, there are 11 buildings in all so plenty of painting practice. I may share some of my lessons learned on these after the gameboard is 100% finished.
If you look backwards at some of the earlier posts, you can clearly see how this section of the board has evolved:
Our next post will talk about creating prepared positions like the one you see in the middle of this picture. We will also introduce a "new" (for me) method for creating brick and stone walls. That should just about do it then for the Project Foy gameboard. We have this game scheduled to debut at Little Wars in Lincolnshire, IL the first weekend in February, so look us up if you are in the area and want to see the board close-up.
Wednesday, November 26, 2008
Project Foy - Timeout Result
This past weekend I helped our junior terrain makers finish their school project. Their 6th grade Social Studies assignment was to re-create something from ancient Egypt. Many of the kids picked the obvious "pyramid made from sugar cubes" project, but my son came up with the idea of picking a famous battle from that time period and building a terrain board and rule set for it. He volunteered my help, but I wanted them to come up with the ideas and, more importantly, to do all of the work.
After digging around on Wikipedia for a while, they settled on the Battle of Pelusium in 525 BC. This was a battle for the fortress of Pharaoh Psametik III and took place in the eastern Nile delta. The boys did a great job of doing the research and deciding what the board needed to look like. I can't say that their idea for the fortress exactly matched the historical account, but we all make allowances in our projects to make them fit our time/space/budget.
The boys used a lot of the techniques we have already presented:

After digging around on Wikipedia for a while, they settled on the Battle of Pelusium in 525 BC. This was a battle for the fortress of Pharaoh Psametik III and took place in the eastern Nile delta. The boys did a great job of doing the research and deciding what the board needed to look like. I can't say that their idea for the fortress exactly matched the historical account, but we all make allowances in our projects to make them fit our time/space/budget.
The boys used a lot of the techniques we have already presented:
Honestly I was not sure what we would do for figures, but I was hoping to find a set of plastic Romans at least to pass off for Egyptian warriors. As luck would have it, our favorite hobby store, Greenfield News and Hobby, had not only Romans, but Egyptians too. We were also able to pick up some cheap palm trees to add character. They look a little cheesy: if we had had more time, I would have gotten the procedure that John uses to scratch build them and had the boys make them. Similarly, the boys ended up only having enough time to mark the bases of the figures to indicate what side they were on. I am hoping they will be interested enough to go back and take a stab at painting them up.
For the Nile River tributaries, I showed them how to blend a variety of colors going from darker to lighter as they moved out from the center. For such an advanced technique, I thought they did a very good job. I finished the river sections off by brushing on Liquid Water after the paint had dried. I just wanted a shiny top-coat. I was not going for the depth that we normally use for rivers and ponds. Overall, I was very pleased with the effort and result.
I did stumble across one new technique as we were trying new things. I found that a Burnt Umber wash over the spackling compound rough coat results in a pretty good river bank. In this case, you want to go easy on the sanding/smoothing.

If we can get it on the schedule, I am going to try and convince my son to run a full-fledged game at Little Wars in February. We play-tested their rules on Saturday night and it seemed to be a reasonable game. But, finally back to Project Foy!!
Friday, November 21, 2008
Project Foy - Timeout
Well, it's been about a week or so since I have had a chance to complete any significant work on Project Foy. My son was assigned a project at school on Egypt and he thought it would be a great idea for his dad to help him make a game board depicting a battle from ancient Egypt. This is a group project so it has meant several sessions of the "project team" coming to our house for the design and build. It has been very interesting to see them go through the same build process that we are.
Originally they came up with a design that covered 4'x5'. Within the Battlefield Hobbies group, we take turns playing the VOR role. That is the "voice of reason". It is funny that even at 11 years old, your project build plans wildly exceed reality in the early planning stages. So, after I stepped in as the VOR (did they realize a board that size takes about 30 hours to build?), their design shrunk to a more manageable 2'x2.5'.
The team has gone through most of the design and rough construction work. This weekend we will put on the final finishing touches. They are also planning on putting together a rule set so they can do a short playtest for the class.
It has been a real experience for me as I step back and allow the boys to create their own vision. I have helped with suggestions and demonstrating techniques, but I am doing my best at resisting the urge to step in and clean up their work. So far, I have limited that to just the most difficult cutting operations.
Anyway, we should be able to get Project Foy back on track next week. I have a series of finishing photos that need to get uploaded before we show the final stages.
Originally they came up with a design that covered 4'x5'. Within the Battlefield Hobbies group, we take turns playing the VOR role. That is the "voice of reason". It is funny that even at 11 years old, your project build plans wildly exceed reality in the early planning stages. So, after I stepped in as the VOR (did they realize a board that size takes about 30 hours to build?), their design shrunk to a more manageable 2'x2.5'.
The team has gone through most of the design and rough construction work. This weekend we will put on the final finishing touches. They are also planning on putting together a rule set so they can do a short playtest for the class.
It has been a real experience for me as I step back and allow the boys to create their own vision. I have helped with suggestions and demonstrating techniques, but I am doing my best at resisting the urge to step in and clean up their work. So far, I have limited that to just the most difficult cutting operations.
Anyway, we should be able to get Project Foy back on track next week. I have a series of finishing photos that need to get uploaded before we show the final stages.
Thursday, November 13, 2008
Project Foy - Finishing Part I
The two things that really set a terrain piece off from the rest are the finishing step and detailing. You could very easily place some buildings and model train trees on your rough board and have a reasonable playing surface. We strive to add more realism to our pieces so that you actually feel like you are part of the game. A properly finished game board should introduce elements that make the game more challenging. One of the first games I ever played with what would become the Battlefield Hobbies group was Brecourt Manor. This game board has an elaborate network of trenches. One of the MG positions was so well camouflaged that I did not see it until my squad was taken under Op Fire (even though the figures had been sitting there for nearly an hour). That's what we are trying to achieve.
I probably mentioned this earlier, but I like to use as much natural material as possible. That means my finishing activities start with a trip around the yard. I am looking for anything that will 1) look reasonable at our scale (20mm in this case) and 2) fit in the general geographic area we are modeling. You would generally not see a 50' flowering bush, so you need material with small details. I try not to get too caught up in trying to exactly match floral and fauna, but you certainly would not use a palm tree in Northwest Europe.
Recall our game takes place on Christmas Day. This simplifies the trees that we need, but makes the foliage a bit harder to find. Luckily we are building in the fall so I have been able to find plenty of dormant plants. I have never been very happy with the pre-made deciduous trees so I was pleased to be looking for winter landscape candidates like this:


I probably mentioned this earlier, but I like to use as much natural material as possible. That means my finishing activities start with a trip around the yard. I am looking for anything that will 1) look reasonable at our scale (20mm in this case) and 2) fit in the general geographic area we are modeling. You would generally not see a 50' flowering bush, so you need material with small details. I try not to get too caught up in trying to exactly match floral and fauna, but you certainly would not use a palm tree in Northwest Europe.
Recall our game takes place on Christmas Day. This simplifies the trees that we need, but makes the foliage a bit harder to find. Luckily we are building in the fall so I have been able to find plenty of dormant plants. I have never been very happy with the pre-made deciduous trees so I was pleased to be looking for winter landscape candidates like this:
 In general, you will find one or two bushes or trees in your yard that produce the type of look you are after. I find myself picking through a fair amount of trimmings before finding what I am after. Of course, you want to take care to find varying sizes and shapes.
While I am at it, I pick up as much brush-like material as possible. Weeds, rather than actual plants, have been more productive for me. Michael's Art Supply is a store that we have found invaluable. It feels kind of odd browsing around a crafts store (all the employees want to HELP you!), but they have a great selection of lichen and moss. I was able to find two varieties in their floral arrangement area that seem to work great for my winter scene. If you don't have a Michael's in your area, you should be able to find similar products at any arts and crafts store.
For the evergreen trees, I found a spectacular line from Bachmann Trains - SceneScapes. These are somewhat expensive, but the quality is outstanding. I am planning to make the evergreens removable on the board so I can maximize this investment. I am using the snow-covered version for this game. We will probably also use them on an up-coming Winter War series of games. They look kind of strange right now, but once the snow cover is down, the effect should be perfect.
Once you have a nice selection of trees, lichen, moss, and other brush we can start the finishing process. A nice by-product of sifting the dirt earlier is that you wind up with a pile of small rocks. I pick out a few of these and that's where I start my finishing. The rocks are glued down with Tacky Glue (from the art supply store). They need to be randomly placed and grouped. Generally larger rocks can be by themselves while smaller rocks tend to be grouped together in piles. I use enough glue that it squeezes out the side when I press the rocks in. After everything is placed, I go back and sprinkle dirt around the rocks, making sure to cover all the extra glue. Once this dries, you can sweep away the extra dirt and the rocks look more naturally embedded in the soil.
 In this shot you can see one of the larger rocks right in the middle of the picture. Notice how it looks nicely weathered and you can just pick out the band of dirt around the base.
Placing trees is the next step. For these, I just start going through the branches I collected and find interesting and varied shapes. You need to try and mix big with small and thick with thin. Remember here too that you are making a gaming table so you need some room for figures unless the area is supposed to be impassable. Once I find a suitable shape, I just break off the branch and snip any outlying pieces. The finished "tree" is then simply pushed into the game board. For the thicker trunks, you may need to actually cut a hole with a hobby knife to avoid the springing effect of the poly board.
Here are a couple shots showing the trees in place:
Once I have the trees placed, I go back and secure them with Tacky Glue into the hole and the same dirt finish as the rocks. I still have not found a reasonable method for trees with leaves. I do not like the look of the ones you can buy. Next summer, I will be on the lookout for a good source in my yard. I'll let you know if I find anything. Next we will go through the final finishing steps ...
Friday, November 7, 2008
Project Foy - Rough Surface Examples
Here are some pictures from the sections I am still working on. The rough surface is almost complete. Only one more small section to go. But this gives you a closer look at the spackled surface before I rough finished it with turf:

This section needs a sweeping before I start with turf to get all of the fine debris off. The section at the very top is already roughed. I will go through the process for creating the trench you see in the middle when we talk about detailing. I guess it probably should have come earlier. Trenches can be created at any time, but it is just easier to have more room when cutting into the boards. On the other hand, I tend to be more careful once some of the finishing is done so I probably do a better job.
Here is a section after sweeping away the extra turf:

And here is a section after the extra soil has been added. This section will be swept one more time to remove any loose material. You will see what this looks like when we start in the finishing section:

This is actually a very nice sequence of pictures. You can see how each step adds a little more depth and realism. This carries into the Finishing steps that we will go into next.
Thursday, November 6, 2008
Project Foy - Rough Surface
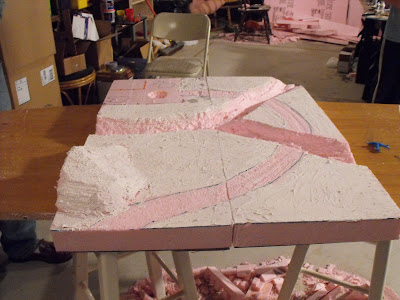
Now that we have a prepared surface, we can start to add the actual terrain. What you use for roughing and finishing is going to depend on your scenario. A scenario in heavy woods is going to look a lot different from something in the desert. The materials are generally the same, just different colors. And the process is exactly the same regardless of what the final look should be. I will outline the steps I followed specifically for Foy, but you should be able to apply the same steps to create any look.
Project Foy is played across rolling farmland through several small villages in southern Belgium. The battle itself takes place on Christmas Day, 1944. On this day, there was moderate snow cover, so this will be a winter scene. Given that, you might ask why we did not just stop with the white, prepared surface. The plan at this point is to use model railroad "snow" to cover the entire board after it is given an autumn look. First, I think it will look more natural, as snow rarely covers 100% of an area. Second, I want to try and remove the snow when we are done so that the board can be used for non-winter scenarios as well. Given the time invested, it would be a shame if it were single purpose.
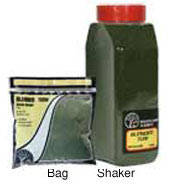
The rough surface on Project Foy is a mix of fine Yellow Turf and fine Blended Turf - Earth. We use Woodland Scenic products:
 I try to incorporate as much natural material as possible into my boards. So, I also throw in a handful of fine dirt. This is just soil I take from my yard and pass through a very fine screen. A few small pebbles are actually desirable, but I try to get it as fine as possible. It is always easier to go back and place more stones. The mixture proportions are more art than science. Unfortunately, I can give no better advice than "until it looks right". One tool I did use was to take a picture of a small section of my board and compare that against a picture of my backyard in autumn. The overall color balance of the two photos was similar - so I assumed the mix was good.
We have always used standard Elmer's glue as the adhesive for our turf. I pour a generous amount over the area I want to cover and then squirt acrylic paint into the glue. Burnt Umber is a nice undercoat color. The purpose of the color is to hide the spackle and/or foamboard if the turf happens to rub off. It also helps to add a little more color depth to the turf itself. Then I use a paint brush to both mix the color and spread the glue to cover the whole area evenly. The glue dries relatively slowly so you can work over a pretty large area.
When the glue is spread evenly I start sprinkling the turf mixture over the area. The application is fairly thick (at least 1/4" - 1/2" but probably thicker) so you will use a lot of turf mixture. However, you will reclaim most of this mixture later on. Let your initial application sit for 10-15 minutes and you will see that in some areas, the glue has absorbed all of the turf mixture. Simply sprinkle on more turf. Repeat this process until no bare spots are seen. After about 30 minutes, go back through and pat down the turf mixture, taking care not to sweep any of it away at this point. This just gets the mixture nicely embedded in the glue and makes for a more consistent surface. Remember - this is the ROUGH surface, not our finished piece. Now let this dry at least overnight.
Once the area is completely dry, the excess turf needs to be removed. We have used two methods. You can lay a tarp on the floor and simply overturn the gameboard above the tarp - shaking slightly. Or you can use a wide, soft bristle brush to "sweep" off the surface. I am tending to like the second method better. It is a lot easier to reclaim the extra into a small bin at the side of the table by brushing. I also like the distressed look it gives to the turf. You can control exactly how much of the turf you wash out.
I do NOT rely on the undercoat color however to wash out the turf. After sweeping I use a spray-on adhesive to adhere more soil to the board on top of the turf. This takes a little practice, but the idea is to generate random areas where the turf has gotten washed away or never grew. Short controlled sprays from an aerosol can do a remarkable job of this. Then just sprinkle fine dirt over the "puddles" of adhesive and allow to dry overnight. For my board, I also immediately sprinkled a very small amount of the turf mixture on top of the fine dirt and blended them by tapping (not sweeping) the paint brush around the area. This resulted in a very nice blend between the turf and dirt. The final step after drying is to go back over the area with the soft brush to remove any loose dirt or turf (the spraying will pull up some turf).
During this project, I was trying a bunch of different methods so I never roughed out more than a small area. In general though, you will want to rough finish the entire board at one time so you get a consistent surface throughout. I will edit this post later with some pictures from the Foy board of the roughed surfaces I recently finished. Now though, this is where the fun part for me starts - Finishing the surface ....
Project Foy is played across rolling farmland through several small villages in southern Belgium. The battle itself takes place on Christmas Day, 1944. On this day, there was moderate snow cover, so this will be a winter scene. Given that, you might ask why we did not just stop with the white, prepared surface. The plan at this point is to use model railroad "snow" to cover the entire board after it is given an autumn look. First, I think it will look more natural, as snow rarely covers 100% of an area. Second, I want to try and remove the snow when we are done so that the board can be used for non-winter scenarios as well. Given the time invested, it would be a shame if it were single purpose.
The rough surface on Project Foy is a mix of fine Yellow Turf and fine Blended Turf - Earth. We use Woodland Scenic products:
I try to incorporate as much natural material as possible into my boards. So, I also throw in a handful of fine dirt. This is just soil I take from my yard and pass through a very fine screen. A few small pebbles are actually desirable, but I try to get it as fine as possible. It is always easier to go back and place more stones. The mixture proportions are more art than science. Unfortunately, I can give no better advice than "until it looks right". One tool I did use was to take a picture of a small section of my board and compare that against a picture of my backyard in autumn. The overall color balance of the two photos was similar - so I assumed the mix was good.We have always used standard Elmer's glue as the adhesive for our turf. I pour a generous amount over the area I want to cover and then squirt acrylic paint into the glue. Burnt Umber is a nice undercoat color. The purpose of the color is to hide the spackle and/or foamboard if the turf happens to rub off. It also helps to add a little more color depth to the turf itself. Then I use a paint brush to both mix the color and spread the glue to cover the whole area evenly. The glue dries relatively slowly so you can work over a pretty large area.
When the glue is spread evenly I start sprinkling the turf mixture over the area. The application is fairly thick (at least 1/4" - 1/2" but probably thicker) so you will use a lot of turf mixture. However, you will reclaim most of this mixture later on. Let your initial application sit for 10-15 minutes and you will see that in some areas, the glue has absorbed all of the turf mixture. Simply sprinkle on more turf. Repeat this process until no bare spots are seen. After about 30 minutes, go back through and pat down the turf mixture, taking care not to sweep any of it away at this point. This just gets the mixture nicely embedded in the glue and makes for a more consistent surface. Remember - this is the ROUGH surface, not our finished piece. Now let this dry at least overnight.
Once the area is completely dry, the excess turf needs to be removed. We have used two methods. You can lay a tarp on the floor and simply overturn the gameboard above the tarp - shaking slightly. Or you can use a wide, soft bristle brush to "sweep" off the surface. I am tending to like the second method better. It is a lot easier to reclaim the extra into a small bin at the side of the table by brushing. I also like the distressed look it gives to the turf. You can control exactly how much of the turf you wash out.
I do NOT rely on the undercoat color however to wash out the turf. After sweeping I use a spray-on adhesive to adhere more soil to the board on top of the turf. This takes a little practice, but the idea is to generate random areas where the turf has gotten washed away or never grew. Short controlled sprays from an aerosol can do a remarkable job of this. Then just sprinkle fine dirt over the "puddles" of adhesive and allow to dry overnight. For my board, I also immediately sprinkled a very small amount of the turf mixture on top of the fine dirt and blended them by tapping (not sweeping) the paint brush around the area. This resulted in a very nice blend between the turf and dirt. The final step after drying is to go back over the area with the soft brush to remove any loose dirt or turf (the spraying will pull up some turf).
During this project, I was trying a bunch of different methods so I never roughed out more than a small area. In general though, you will want to rough finish the entire board at one time so you get a consistent surface throughout. I will edit this post later with some pictures from the Foy board of the roughed surfaces I recently finished. Now though, this is where the fun part for me starts - Finishing the surface ....
Subscribe to:
Posts (Atom)
